
Livraison le jour même ou le lendemain

Qualité garantie

Débloquez vos offres de bienvenue: Livraison GRATUITE | Jusqu'à -80 % | 30 jours d'essai gratuits à JoyPlus
Téléchargez l'application
What’s the final step before painting, the one that separates an amateur result from a professional finish? Surface preparation. To achieve a perfectly smooth surface, there's no secret: you need the right tools. Whether you're a professional contractor or a seasoned DIYer, a well-designed drywall finishing kit is your best ally for applying compound and sanding walls with efficiency and precision.
This guide breaks down the essential criteria (functionality, durability, ergonomics) and presents our selection of tools designed to simplify your wall preparation before painting and guarantee a pro-level result.
Before you head to the checkout, here are the key points that will make all the difference on the job site.
A good kit should cover the two main stages of finishing: applying compound and sanding. The ideal setup combines putty knives of various sizes (for applying and smoothing) and sanding tools designed for both flat surfaces and corners. A cohesive system saves time and ensures a uniform finish.
Drywall work is often long and repetitive. Ergonomic handles that provide a good grip are therefore crucial for reducing fatigue and improving precision. For the knives, look for blades made of stainless steel: they are flexible enough to spread compound effortlessly and won't rust. For sanding, a sturdy and easy-to-handle drywall sanding block is simply indispensable.
A wall isn't just one large flat surface. A finishing project always involves tackling inside corners, edges, and other hard-to-reach areas. A good wall sanding kit must therefore be versatile and offer solutions for every situation, such as interchangeable heads (round for the bulk of the work, rectangular or triangular for corners).
Here is a selection of kits that meet the demands of modern job sites, focusing on performance and practicality.

Highlights: This kit stands out with its dual sanding head system. It includes a 220?mm radial sander to quickly cover large areas, and a 225?x?85?mm rectangular sander for precision work along edges and in corners. The ergonomic handle clicks on and off with a simple push-button, allowing you to switch from a direct grip to use with a telescopic pole (not included).
Advantages:
Who is it for? Ideal for contractors and demanding DIYers undertaking complete renovations. It's the perfect tool for anyone looking to handle both large surfaces and detailed finishing with a single system.

Highlights: Designed specifically for the most delicate task in drywall finishing, this kit is the specialist for sanding inside corners (walls and ceilings). Its unique shape perfectly conforms to the angle for uniform sanding, without ever overlapping or damaging adjacent surfaces. Like the rest of the SURFEX range, it features a removable ergonomic handle that is compatible with an extension pole.
Advantages:
Who is it for? The essential tool for any pro or detail-oriented DIYer. It solves a problem that conventional sanders (flat or round) simply cannot handle correctly.
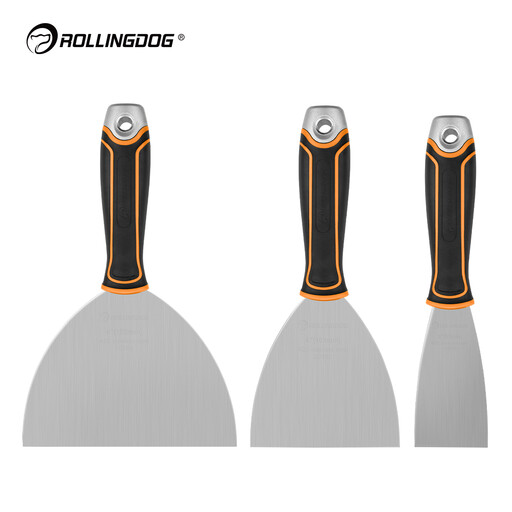
Highlights: This set of putty knives is an essential staple of any good drywall finishing kit. It includes the three key widths (5?cm, 10?cm, and 15?cm) to cover all situations: filling a small crack, taping joints, or smoothing larger areas. The flexible 420 stainless steel blades are hollow-ground, giving them the ideal flexibility for a perfect, smooth finish. A clever bonus: the metal end cap on the handle can be used to set a protruding nail or to press down tape.
Advantages:
Who is it for? An indispensable trio for absolutely everyone, from the pro to the knowledgeable amateur. These three sizes cover 90% of common needs for applying compound, spackle, or plaster.
The tools featured in this guide provide an excellent foundation for most finishing jobs. Since every project has its own challenges, feel free to explore our full catalog to find complementary tools or alternatives.
Discover All Our Construction Tools
1. What grit of sandpaper should I choose for drywall? The golden rule is to work in stages. Start with a medium grit (80 or 120) for the initial pass to remove major imperfections or excess compound. Finish with a fine grit (240 or higher) to achieve a perfectly smooth, scratch-free surface ready for primer. The kits in our selection conveniently include these three essential grits.
2. How do I sand a wall without leaving scratches? The secret is to not apply too much pressure; let the abrasive do the work. Also, remember to thoroughly dust the surface between passes, especially before switching to a finer grit. Finally, quality tools with a perfectly flat base are your best guarantee for a uniform result.
3. Do I need a full kit just to patch a hole? To fill a single anchor hole or a small crack, a single 5?cm putty knife and a piece of sandpaper are more than enough. However, as soon as you start taping joints or prepping an entire wall for paint, a well-equipped kit becomes essential for working efficiently and achieving a truly professional and consistent finish.